How to File an Insurance Claim After Winter Storm Damage: A Step-by-Step Guide for Ohio Homeowners
Winter storms can wreak havoc on Ohio homes, leaving behind everything from frozen pipes and ice dam damage to collapsed roofs and broken windows. If you’re facing property damage after a winter storm, knowing how to properly file an insurance claim can mean the difference between a smooth, successful process and months of frustration—or worse, a denied claim.
At DSB Insurance Agency in Chillicothe, we guide Ross County and Ohio homeowners through the claims process every winter. We’ve seen what works, what doesn’t, and the costly mistakes people make when they’re stressed and trying to handle damage quickly. This comprehensive guide will walk you through every step of filing a winter storm insurance claim, ensuring you get the maximum settlement you’re entitled to.
Understanding Winter Storm Coverage: What’s Typically Covered?
Before you file a claim, it’s essential to understand what your homeowners insurance policy covers (and what it doesn’t) when it comes to winter weather damage.
Usually Covered:
Ice Dam Damage
- Water damage to ceilings, walls, and floors from ice dam leaks
- Damaged insulation from water infiltration
- Structural damage to roof decking or rafters
- Damaged personal property (furniture, electronics, clothing)
Frozen and Burst Pipes
- Water damage to your home’s interior
- Structural damage from water leaks
- Cost to repair or replace damaged pipes
- Professional water extraction and drying
- Mold remediation (up to policy limits)
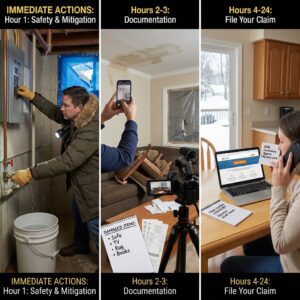
Roof Damage
- Collapse from excessive snow or ice weight
- Shingle damage from ice or wind
- Gutter damage from ice accumulation
- Structural damage to roof support
Tree Damage
- Damage to your home if a tree falls on it
- Damage to other structures (garage, shed, fence)
- Debris removal costs
Wind Damage
- Broken windows from flying debris
- Siding damage from high winds
- Damaged roof from wind uplift
- Structural damage from severe winter storms
Usually NOT Covered:
❌ Ice dam or snow removal costs (the removal itself is considered maintenance)
❌ Frozen pipes in unheated areas if you didn’t maintain proper heat
❌ Gradual damage from recurring issues you didn’t address
❌ Flood damage (requires separate flood insurance)
❌ Damage from lack of maintenance (old roof that finally gave way)
❌ Power outage food spoilage (unless you have specific coverage)
❌ Landscaping damage beyond policy limits (usually $500-$1,500 per plant)
Important Note: Coverage varies significantly by policy. Always review your specific policy or call your agent to understand your coverage before assuming something is or isn’t covered.
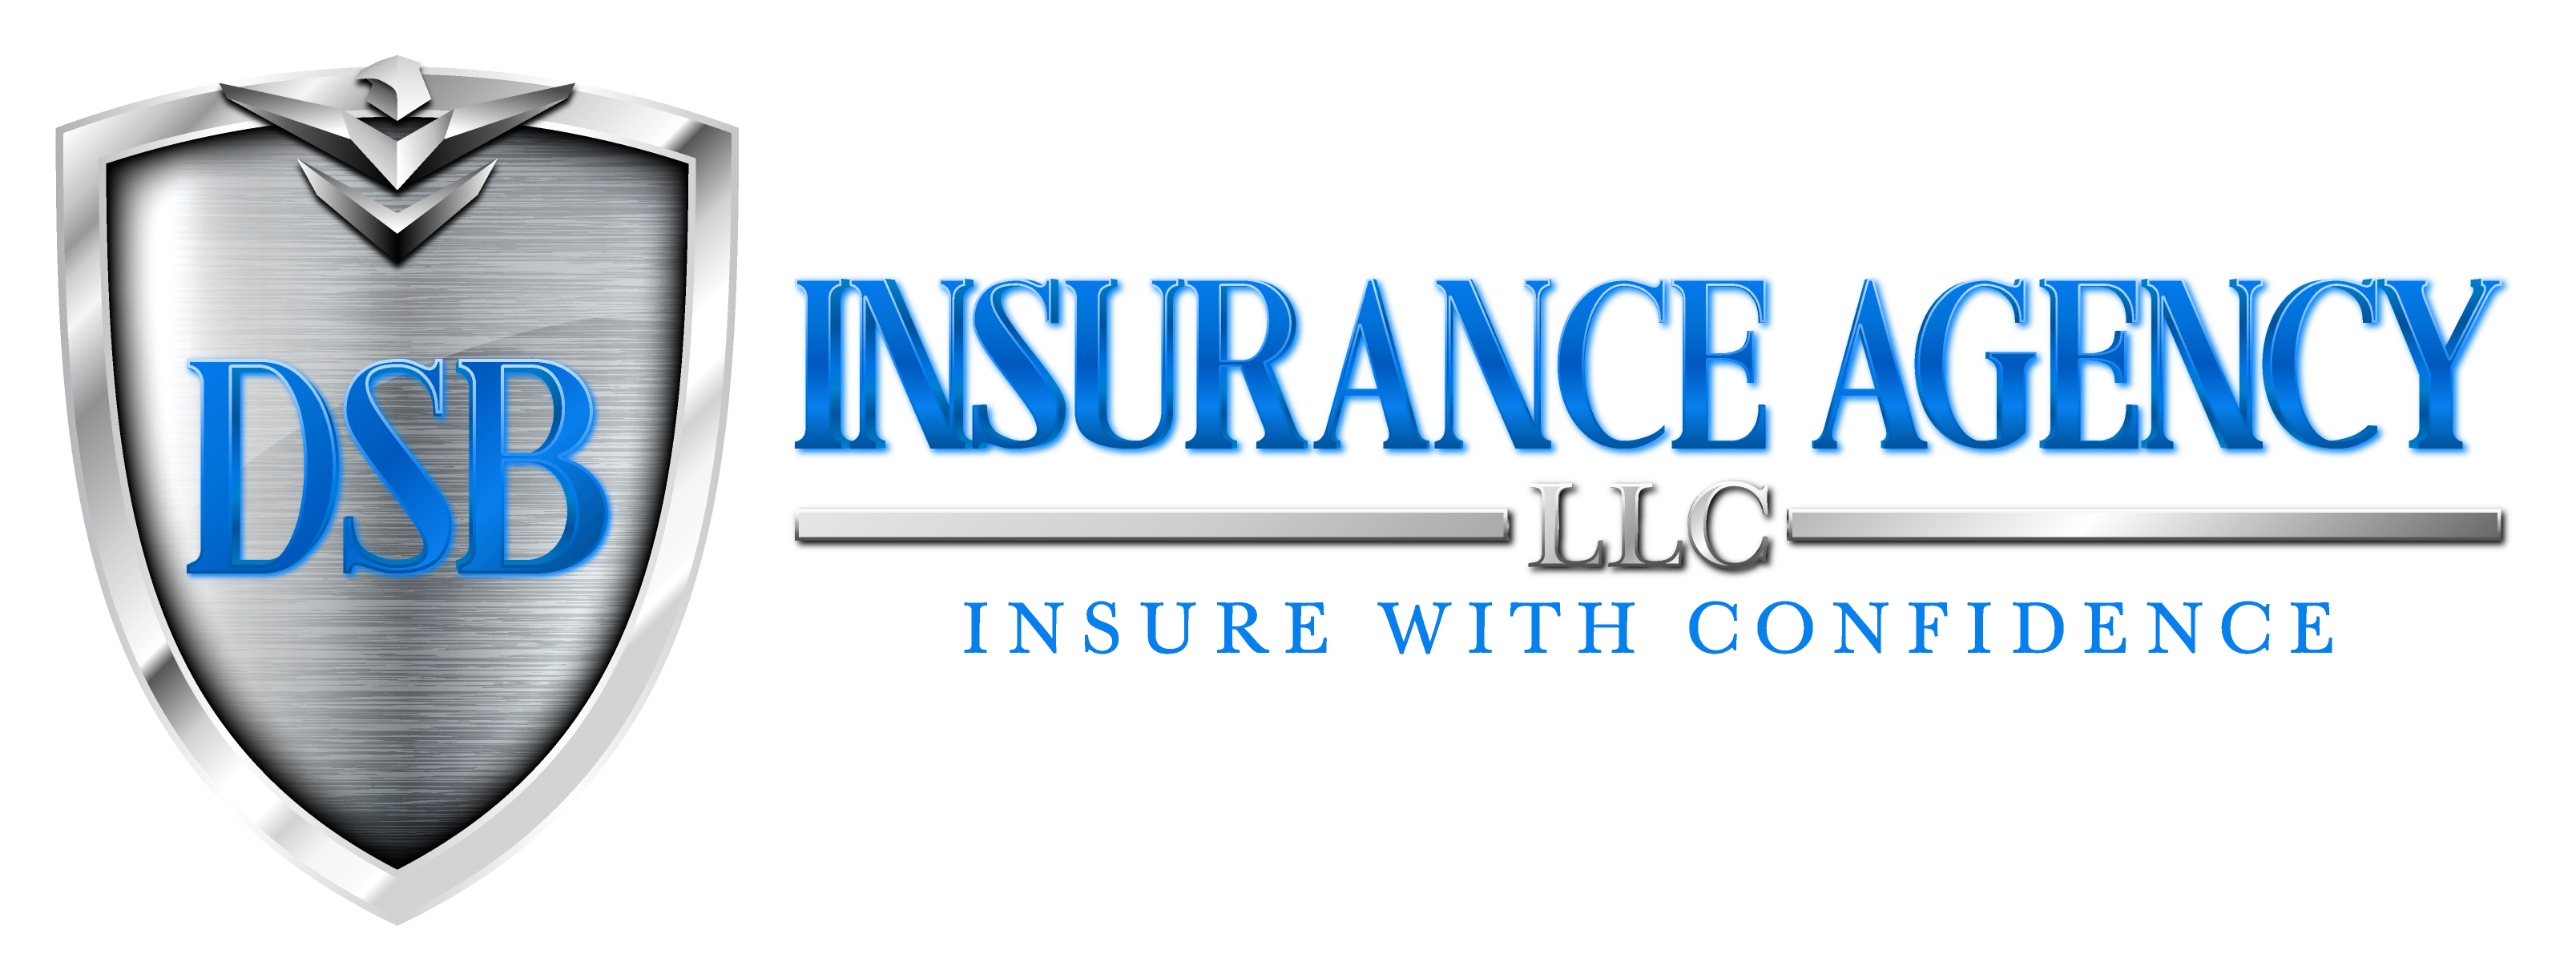
Step 1: Ensure Safety First (Before Anything Else)
Before you even think about documenting damage or calling your insurance company, ensure your family’s safety.
Immediate Safety Actions:
If You Have Structural Damage:
- Evacuate if you see sagging ceilings, cracked walls, or hear creaking sounds
- Don’t enter rooms with visible structural damage
- Keep everyone away from the damaged area
- Call 911 if there’s immediate danger
If You Have Water Damage:
- Turn off electricity to affected areas if safe to do so
- Don’t touch electrical outlets or appliances in wet areas
- Watch for signs of electrical hazards (sparks, burning smell, hot outlets)
- Wear boots and gloves when walking through standing water
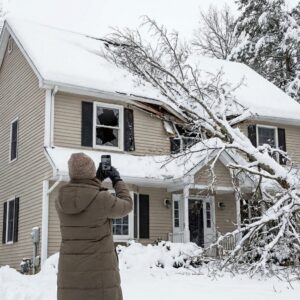
If You Have a Burst Pipe:
- Shut off the main water supply immediately (know where this is before emergencies!)
- Turn off electricity near the leak
- Open faucets to drain remaining water from pipes
- Move valuables away from water
Carbon Monoxide Risks: If you’re using alternative heating sources or generators during the storm:
- Ensure CO detectors are working
- Never use outdoor equipment (grills, generators) indoors
- If CO detector sounds, evacuate and call 911
Roof Collapse or Heavy Snow Load:
- Evacuate immediately if you hear cracking or see sagging
- Don’t attempt to remove snow yourself if structural damage is suspected
- Keep everyone away from the building until professionals assess
Step 2: Stop Further Damage (Your Legal Duty)
Your insurance policy requires you to take reasonable steps to prevent additional damage. This is called “duty to mitigate.” Failing to do this can result in your claim being denied or reduced.
Immediate Mitigation Steps:
For Water Damage:
- Place buckets under active leaks
- Use towels to soak up standing water
- Move furniture, electronics, and valuables to dry areas
- Open cabinet doors to help wet areas dry
- Use fans to increase air circulation (if safe)
- Remove wet carpeting if possible
- Take wet items outside to dry if weather permits
For Roof Damage:
- Tarp exposed areas to prevent rain/snow from entering
- Place buckets under leaks
- Cover broken windows with plywood or plastic sheeting
- Move belongings away from damaged areas
For Broken Windows:
- Board up broken windows with plywood
- Cover with plastic sheeting temporarily
- Sweep up glass safely
- Seal off room to prevent weather intrusion
For Frozen Pipes:
- Keep faucets open to relieve pressure
- Apply gentle heat to frozen sections (never use open flame)
- Continue heating the area
- Call a plumber if you can’t locate or thaw the frozen section
What You CAN’T Do (Without Insurance Approval):
❌ Make permanent repairs (minor temporary fixes are okay)
❌ Throw away damaged items before documenting them
❌ Sign contracts with restoration companies before notifying insurance
❌ Replace major structural elements without adjuster inspection
Save All Receipts!
Keep receipts for:
- Tarps, plywood, buckets, fans
- Emergency plumber or electrician calls
- Hotel costs if your home is uninhabitable
- Restaurant meals if you can’t use your kitchen
- Temporary heating equipment
- Water extraction equipment rental
These emergency expenses are often reimbursable, but only with proper documentation.
Step 3: Document Everything (This Is Critical!)
Thorough documentation is the single most important factor in getting your claim approved and maximized. Insurance adjusters need proof of damage, and memories fade—document everything immediately.
Photo and Video Documentation:
Take Photos of EVERYTHING:
- Overall view of each damaged area (wide shots)
- Close-up shots of specific damage
- Serial numbers or model numbers of damaged appliances/electronics
- Water lines showing how high water reached
- Damage to personal belongings
- Exterior damage (roof, siding, gutters)
- Before and after photos if you have them
Video Walkthrough:
- Record a video walking through your entire home
- Narrate what you’re seeing: “This is the living room ceiling where the ice dam caused water damage…”
- Show the extent of damage from multiple angles
- Date and time-stamp if your phone allows
What to Photograph:
- Every room affected by damage
- Walls, ceilings, floors
- Windows and doors
- Appliances and electronics
- Furniture and personal belongings
- Carpeting and flooring
- Exterior damage
- The source of damage (ice dam on roof, broken window, etc.)
- Any temporary repairs you make
Written Documentation:
Create a Damage Inventory:
- List every damaged item
- Include: Item name, brand, model, age, purchase price, estimated replacement cost
- Note the extent of damage: destroyed, repairable, partial damage
- Group by room for organization
Timeline Documentation:
- When did the storm occur?
- When did you discover the damage?
- What time did you take mitigation steps?
- When did you call your insurance company?
Witness Information: If anyone witnessed the damage or can verify when it occurred:
- Get their names and contact information
- Ask if they’d be willing to provide a statement
Professional Documentation:
Get Written Estimates:
- Plumber’s assessment for pipe damage
- Roofer’s estimate for roof repairs
- Contractor’s estimate for structural repairs
- Water restoration company’s assessment
Weather Documentation:
- Save weather reports showing storm conditions
- Download National Weather Service statements
- Screenshot radar images showing storm timing
- Keep newspaper articles about the storm
Step 4: Contact Your Insurance Agent Immediately
Most policies require “prompt notification” of claims. Waiting weeks to report damage can jeopardize your claim.
How to Report Your Claim:
Option 1: Call Your Local Agent (Recommended)
- Your agent knows your policy and can guide you
- They can advocate on your behalf
- They’ll ensure you don’t miss important steps
- DSB Insurance Agency: (740) 656-5119
Option 2: Call Insurance Company Directly
- Available 24/7 for most carriers
- Get a claim number immediately
- File online through carrier’s website or mobile app
Option 3: File Online
- Many carriers have online claim filing
- Upload photos directly
- Track claim status online
Information You’ll Need:
When you call to file a claim, have ready:
- Policy number
- Date and time of damage
- Description of what happened
- List of damaged property
- Photos/videos of damage
- Contact information
- Temporary repairs you’ve made
- Whether you need emergency services
What to Say (And What NOT to Say):
DO Say:
- “Our home sustained damage from the winter storm on [date]”
- “We’ve taken steps to prevent further damage”
- “I have photos documenting the damage”
- “We’d like to file a claim”
DON’T Say:
- “I think this is my fault because…” (don’t admit fault)
- “The damage is probably minor” (don’t minimize)
- “I’m not sure if this is covered” (let them decide)
- “We had this problem before” (unless true and relevant)
Get This Information:
Before ending the call:
- Claim number (write it down!)
- Name of claims adjuster assigned
- Direct phone number for adjuster
- Timeline for adjuster visit
- What happens next
- Whether they’re sending an emergency response team
Step 5: Meet With the Insurance Adjuster
An insurance adjuster will visit your property to assess the damage and determine how much the insurance company will pay. This meeting is crucial to your claim’s outcome.
Before the Adjuster Arrives:
Prepare Your Documentation:
- Print photos showing all damage
- Organize your damage inventory
- Gather receipts for emergency repairs
- Collect contractor estimates
- Have proof of ownership for major items (receipts, manuals, photos)
Don’t Clean Up Too Much:
- Leave damage visible for adjuster to see
- Don’t throw away damaged items yet
- Keep evidence of what caused the damage
Make a List of All Damage:
- Write down everything damaged
- Note things you might forget to mention
- Include damage to outdoor items (if covered)
During the Adjuster Visit:
Do This: ✓ Walk them through every damaged area ✓ Point out all damage, even minor items ✓ Provide your documentation ✓ Ask questions about coverage ✓ Take notes on what they say ✓ Get their business card and direct contact info ✓ Ask when you’ll receive the estimate ✓ Be honest and thorough
Don’t Do This: ❌ Agree to estimates on the spot without reviewing ❌ Sign anything you don’t understand ❌ Accept “verbal approvals” – get everything in writing ❌ Let them rush through the inspection ❌ Exaggerate damage (be honest) ❌ Hide damage (show everything)
Questions to Ask:
- “What is and isn’t covered under my policy?”
- “What’s my deductible?”
- “How long until I receive the claim settlement?”
- “Will this be paid as replacement cost or actual cash value?”
- “Can I choose my own contractor?”
- “What if we discover additional damage later?”
- “Will my rates go up if I file this claim?”
Red Flags:
Watch out for adjusters who:
- Rush through the inspection
- Dismiss damage without explanation
- Pressure you to sign documents quickly
- Deny coverage without showing policy language
- Seem inexperienced or unprepared
If you have concerns, contact your agent immediately.
Step 6: Review the Settlement Offer Carefully
After the adjuster’s visit, you’ll receive a settlement offer outlining what the insurance company will pay. Don’t accept immediately—review it thoroughly.
Understanding Your Settlement:
Your settlement may come in two payments:
Payment 1: Actual Cash Value (ACV)
- Replacement cost minus depreciation
- Released relatively quickly
- Used to begin repairs
Payment 2: Recoverable Depreciation
- The depreciation amount held back
- Paid after repairs are completed
- Requires proof of completed work and receipts
Review These Items:
Check the Estimate:
- Does it include all damaged items you documented?
- Are quantities accurate? (e.g., square footage of damaged drywall)
- Are prices reasonable for your area?
- Is anything missing?
Verify Coverage:
- Dwelling coverage amount
- Contents coverage amount
- Additional living expenses if you can’t live at home
- Deductible amount
Look for Exclusions:
- What items are they not covering?
- Do you agree with their reasons?
- Is it based on policy exclusions?
If You Disagree With the Offer:
Step 1: Document Disagreements
- Make a list of missing items
- Note items valued too low
- Gather evidence supporting your position
Step 2: Contact Your Agent
- They can often resolve issues quickly
- They’ll review the estimate with you
- They can advocate on your behalf
Step 3: Request a Re-Inspection
- If damage was missed, ask adjuster to return
- Point out specific items they missed
- Provide additional documentation
Step 4: Get a Second Opinion
- Hire your own contractor for an estimate
- Compare to insurance company’s estimate
- Submit to insurance as supplemental documentation
Step 5: File a Complaint
- Ohio Department of Insurance: (800) 686-1526
- They can mediate disputes
- File online at insurance.ohio.gov
Step 6: Consider Public Adjuster (for large, complex claims)
- Independent adjusters who work for you, not the insurance company
- They take a percentage of your settlement (usually 10-15%)
- Useful for major damage or denied claims
Step 7: Make Repairs and Submit Final Documentation
Once you accept the settlement, it’s time to make repairs.
Choosing a Contractor:
Get Multiple Bids:
- At least 3 written estimates
- Compare scope of work, not just price
- Verify licensing and insurance
- Check references and reviews
Verify Contractor:
- Ohio contractor license (if required)
- Proof of liability insurance
- Workers’ compensation insurance
- Better Business Bureau rating
- Online reviews (Google, Yelp, Angi)
Red Flags: ❌ Asks for full payment upfront ❌ Pressures you to sign immediately ❌ Offers to waive your deductible ❌ No written contract ❌ Can’t provide references ❌ No local address or office
Contract Should Include:
- Detailed scope of work
- Timeline for completion
- Payment schedule (typically draws tied to completion milestones)
- Materials to be used (brands, quality)
- Warranty information
- License and insurance information
During Repairs:
Save Everything:
- All invoices and receipts
- Photos of work in progress
- Documentation of materials used
- Change orders if scope changes
- Final inspection reports
Monitor Progress:
- Check work quality regularly
- Ensure work matches contract
- Don’t make final payment until 100% satisfied
- Get warranties in writing
Submitting for Final Payment:
You’ll Need:
- Itemized invoices from contractors
- Receipts for all work
- Photos of completed repairs
- Proof materials match estimate
- Final inspection certificate (if required)
Submit to Insurance:
- Send via email or online portal
- Keep copies of everything
- Follow up if you don’t hear back in 10 business days
Common Mistakes That Can Ruin Your Claim
Mistake #1: Waiting Too Long to File
Why It’s a Problem:
- Policies require “prompt notification”
- Difficult to prove when damage occurred
- Additional damage may occur from delay
- May be denied as “unreported claim”
Solution: File within 24-48 hours of discovering damage, even if you’re still assessing the full extent.
Mistake #2: Not Documenting Thoroughly
Why It’s a Problem:
- Can’t prove what was damaged
- Settlement based only on what adjuster sees
- Memories fade—you forget items
- Hard to dispute low valuations
Solution: Photo and video everything immediately, even if it seems minor.
Mistake #3: Throwing Away Damaged Items
Why It’s a Problem:
- Insurance needs to verify damage
- Can’t prove items existed or extent of damage
- Looks like fraud if items disappear
- Claim may be denied or reduced
Solution: Keep damaged items until claim is settled, or at minimum, photograph everything before disposal.
Mistake #4: Making Permanent Repairs Before Adjuster Visit
Why It’s a Problem:
- Adjuster can’t see actual damage
- Can’t verify extent of repairs needed
- Insurance may refuse to pay for work already done
- May violate policy terms
Solution: Make only temporary repairs to prevent further damage. Get adjuster approval before permanent work.
Mistake #5: Accepting First Offer Without Review
Why It’s a Problem:
- Initial estimates often low or incomplete
- May miss hidden damage
- Depreciation often underestimated
- You have rights to negotiate
Solution: Review carefully, get second opinions, negotiate if needed.
Mistake #6: Not Reading Your Policy
Why It’s a Problem:
- Don’t know what’s covered
- Miss deadlines or requirements
- Assume coverage that doesn’t exist
- Don’t understand your rights
Solution: Read your policy now, before damage occurs. Call your agent with questions.
Mistake #7: Signing a “Direction to Pay” Without Understanding
Why It’s a Problem:
- Gives contractor rights to your insurance money
- You lose control of funds
- Contractor may get paid even if work is incomplete
- Hard to resolve disputes
Solution: Understand what you’re signing. Consider paying contractor directly from insurance funds you control.
Mistake #8: Not Reporting Additional Damage Discovered Later
Why It’s a Problem:
- May be considered a “new claim”
- Could exceed time limits for original claim
- Insurance may argue it’s separate damage
Solution: As soon as you discover additional damage related to the original claim, report it immediately as “supplemental damage.”
Special Situations: Ohio-Specific Considerations
Frozen Pipes in Ohio
Ohio’s freeze-thaw cycles make frozen pipes extremely common. Here’s what you need to know:
Coverage Usually Applies If:
- You maintained reasonable heat in the home
- Pipes froze despite proper precautions
- You weren’t negligent
Coverage May Be Denied If:
- You left home unheated during freezing weather
- Pipes were in known unheated areas without insulation
- Previous claims for same issue without addressing the problem
Ohio Specifics:
- Document that heat was on (utility bills, thermostat photos)
- Show insulation efforts if in unheated space
- Get plumber’s assessment of whether freeze was preventable
Ice Dams in Ohio
Ice dams are prevalent in Ohio due to our winter weather patterns.
Typically Covered:
- Interior water damage from ice dam leaks
- Structural damage to roof or attic
Typically NOT Covered:
- Ice dam removal costs
- Damage if you neglected roof maintenance
- Damage if you knew about poor attic insulation and didn’t fix it
Document:
- When ice dam formed
- Steps you took to remove snow from roof
- Proof of proper attic insulation and ventilation
- Photos of ice dam and resulting damage
Sewer Backup Coverage
Many Ohio homeowners don’t realize sewer backup requires special coverage.
Standard Policies Usually EXCLUDE:
- Water backup from sewers or drains
- Sump pump overflow
Optional Coverage:
- Available as endorsement ($50-150/year typically)
- Covers $5,000-$25,000 in damage
- Essential in areas with aging sewer systems
If You Don’t Have Coverage:
- Check if cause was actually sewer backup or surface water
- Surface water may be covered differently
- Document everything in case there’s a coverage argument
Working With DSB Insurance Agency
At DSB Insurance Agency, we’re with you every step of the claims process.
How We Help:
Before You File:
- Review your policy to understand coverage
- Advise whether damage is likely covered
- Help you decide if you should file (sometimes damage is less than deductible)
During the Claim:
- File the claim on your behalf
- Communicate with insurance company
- Review adjuster estimates
- Advocate for fair settlement
- Answer questions throughout the process
After Settlement:
- Help you understand payment structure
- Advise on contractor selection
- Assist with supplemental damage claims
- Ensure claim is closed properly
When to Call Us:
✓ Immediately when damage occurs
✓ Before speaking to insurance adjuster
✓ If you disagree with settlement offer
✓ If claim is denied
✓ If you discover additional damage
✓ Anytime you have questions or concerns
We Don’t Work for the Insurance Company—We Work for YOU.
Timeline: What to Expect
Understanding the claims timeline helps manage expectations:
Day 1-2: Damage Occurs
- Ensure safety
- Stop further damage
- Document everything
- File claim
Day 2-5: Initial Response
- Receive claim number
- Adjuster assigned
- Adjuster schedules visit
Day 5-10: Adjuster Visit
- Inspection of property
- Review of documentation
- Discussion of coverage
Day 10-15: Settlement Offer
- Receive estimate and settlement
- Review carefully
- Negotiate if needed
Day 15-20: Accept Settlement
- Sign agreement
- Receive initial payment (ACV)
Week 3-8: Make Repairs
- Hire contractors
- Complete repairs
- Document work
Week 8-12: Final Payment
- Submit invoices
- Receive recoverable depreciation
- Claim closed
Note: Complex claims may take longer. Stay in regular contact with your adjuster and agent.
When to Consider NOT Filing a Claim
Not all damage should result in a claim. Consider these factors:
Don’t File If:
Damage is Less Than Deductible
- Example: $2,000 damage, $2,500 deductible
- You pay 100% anyway, plus risk rate increase
Damage is Slightly Above Deductible
- Example: $3,000 damage, $2,500 deductible
- You only get $500, but claim stays on record
- May impact future rates or insurability
It’s Maintenance, Not Damage
- Old roof that finally wore out
- Gradual deterioration over time
- Likely to be denied anyway
You Can Afford to Pay Out of Pocket
- For minor damage
- To avoid claims history
- To keep rates stable
DO File If:
✓ Damage significantly exceeds deductible
✓ Structural damage is involved
✓ You can’t afford repairs otherwise
✓ Liability issues are involved
✓ Damage could worsen if not repaired properly
Not Sure? Call DSB Insurance at (740) 656-5119 and we’ll help you decide.
Your Post-Storm Checklist
Print this and keep it with your insurance documents:
Immediately After Damage:
☐ Ensure everyone’s safety
☐ Stop additional damage (mitigation)
☐ Take photos and videos of everything
☐ Make written inventory of damaged items
☐ Save all receipts for emergency repairs
☐ Contact insurance company/agent
☐ Get claim number and adjuster info
Before Adjuster Visit:
☐ Organize all documentation
☐ Get contractor estimates
☐ Make list of questions
☐ Review your policy
☐ Don’t throw away damaged items
☐ Don’t make permanent repairs
During/After Adjuster Visit:
☐ Walk through all damage
☐ Point out everything
☐ Ask about coverage questions
☐ Get timeline for settlement
☐ Take notes on conversation
After Receiving Settlement:
☐ Review estimate thoroughly
☐ Compare to contractor estimates
☐ Negotiate if too low
☐ Get multiple contractor bids
☐ Verify contractor licensing
☐ Sign contract with contractor
During Repairs:
☐ Monitor work quality
☐ Save all invoices/receipts
☐ Photo work in progress
☐ Get warranties in writing
☐ Don’t pay in full until complete
Final Steps:
☐ Submit final invoices to insurance
☐ Receive final payment
☐ Verify claim is closed
☐ Review policy for next year
The Bottom Line
Filing a winter storm insurance claim doesn’t have to be overwhelming. The keys to success are:
- Act quickly – File within 24-48 hours
- Document thoroughly – Photos, videos, lists
- Prevent further damage – Your legal duty
- Understand your policy – Know what’s covered
- Work with your agent – We’re your advocate
- Review settlements carefully – Don’t accept too quickly
- Choose contractors wisely – Quality matters
- Keep everything – Receipts, photos, correspondence
Winter storms are stressful enough without worrying about whether your insurance claim will be approved. By following this guide, you’ll maximize your chances of a smooth, successful claim process.
Remember: DSB Insurance Agency is here to help every step of the way.
Contact DSB Insurance Agency
Have Questions About Filing a Claim?
Experienced Winter Storm Damage?
Need Help Understanding Your Coverage?
We’re here for you.
DSB Insurance Agency
95 N. Mulberry St., Suite E
Chillicothe, OH 45601
(740) 656-5119
myagent@dsbinsurance.com
www.dsbinsurance.com
Office Hours:
Monday – Friday: 8:00 AM – 5:00 PM
Saturday: By Appointment
Emergency Claims: Call anytime
Serving Chillicothe, Ross County, and Southern Ohio since 1948.
Related Articles: